


Detailed Protocol for Western Blot (WB) Analysis (For Reference Only)
The core of Western Blot (Protein Blotting) lies in separating proteins via electrophoresis, followed by specific detection of target proteins through immune reactions. Each step of the protocol must be strictly controlled to ensure accurate results. The detailed procedures are as follows:
1. Pre-Experimental Preparation
2. Protein Quantification and Loading
3. SDS-PAGE Electrophoresis
4. Protein Transfer (Blotting)
5. Blocking and Antibody Incubation
6. Detection and Result Analysis
I. Pre-Experimental Preparation
Reagent Preparation: Prepare or formulate lysis buffer (containing protease/phosphatase inhibitors), protein quantification reagents (e.g., BCA kit), SDS-PAGE electrophoresis reagents (gel stock solution, Tris-glycine electrophoresis buffer, loading buffer), transfer buffer, blocking solution (e.g., 5% non-fat milk), primary/secondary antibodies (diluted in antibody dilution buffer at the recommended ratio), and chemiluminescent detection substrate.
Equipment Preparation: Electrophoresis tank, transfer apparatus, nitrocellulose (NC) membrane or PVDF membrane (activated with methanol), filter papers, pipettes, centrifuge tubes, and gel imaging system.
Sample Preparation: Process samples according to type (cells/tissues). For cells: harvest by trypsinization followed by centrifugation. For tissues: homogenize first. Add pre-chilled lysis buffer, lyse on ice for 30 minutes, centrifuge at 12,000 rpm at 4°C for 15 minutes, and collect the supernatant as the protein sample.
II. Protein Quantification and Loading
Protein Quantification: Follow the BCA kit instructions. Mix standards and samples with BCA working solution, incubate at 37°C for 30 minutes, measure absorbance at 562 nm using a microplate reader, and calculate protein concentration from the standard curve.
Sample Treatment: Based on quantification results, mix equal amounts of protein sample with loading buffer (containing β-mercaptoethanol), boil at 100°C for 5-10 minutes to denature proteins, and set aside to cool.
Gel Preparation: Select resolving gel concentration based on target protein molecular weight (higher concentration for small molecules, lower concentration for large molecules). First pour the resolving gel, overlay with a water layer to flatten the gel surface. After polymerization, discard the water and pour the stacking gel. Insert a comb and wait for complete polymerization before removing the comb.
Loading: Place the gel in the electrophoresis tank, fill with Tris-glycine electrophoresis buffer, and load the treated protein samples and protein Marker (for molecular weight reference) into the wells.
III. SDS-PAGE Electrophoresis
Stacking Gel Phase: Connect the power supply, set the voltage to 80 V, and run electrophoresis until the bromophenol blue indicator enters the resolving gel (approximately 20-30 minutes).
Resolving Gel Phase: Adjust the voltage to 120 V and continue electrophoresis until the bromophenol blue indicator reaches the bottom of the gel (approximately 60-90 minutes). Turn off the power and remove the gel.
IV. Protein Transfer (Blotting)
Transfer Sandwich Assembly: Assemble the transfer sandwich in the order: cathode → filter paper → gel → membrane → filter paper → anode. Ensure no air bubbles are trapped between layers (bubbles inhibit protein transfer) and the membrane size matches the gel.
Transfer Operation: Place the transfer sandwich in the transfer apparatus, add pre-chilled transfer buffer. Set transfer conditions based on membrane type and protein molecular weight (e.g., 200 mA constant current for 30-90 minutes for PVDF membranes). Maintain low temperature during transfer (place an ice pack outside the transfer tank).
Transfer Verification: After transfer, stain the membrane with Ponceau S solution for 5 minutes. Clear protein Marker bands indicate successful transfer. Rinse the stain with TBST buffer afterward.
V. Blocking and Antibody Incubation
Blocking: Incubate the transferred membrane in blocking solution on a shaker at room temperature for 1-2 hours (or overnight at 4°C) to block non-specific binding sites on the membrane and reduce background noise.
Primary Antibody Incubation: Discard the blocking solution, wash the membrane with TBST 3 times (10 minutes each). Add diluted specific primary antibody and incubate on a shaker at 4°C overnight (or 2 hours at room temperature) to allow specific binding between the primary antibody and target protein.
Secondary Antibody Incubation: Discard the primary antibody, wash the membrane with TBST 3 times (10 minutes each). Add diluted fluorescently labeled or enzyme-labeled (e.g., HRP) secondary antibody and incubate on a shaker at room temperature for 1 hour to enable specific binding between the secondary antibody and primary antibody.
Final Washing: Discard the secondary antibody, wash the membrane with TBST 3 times (10 minutes each) to thoroughly remove unbound secondary antibody and avoid interference with subsequent detection.
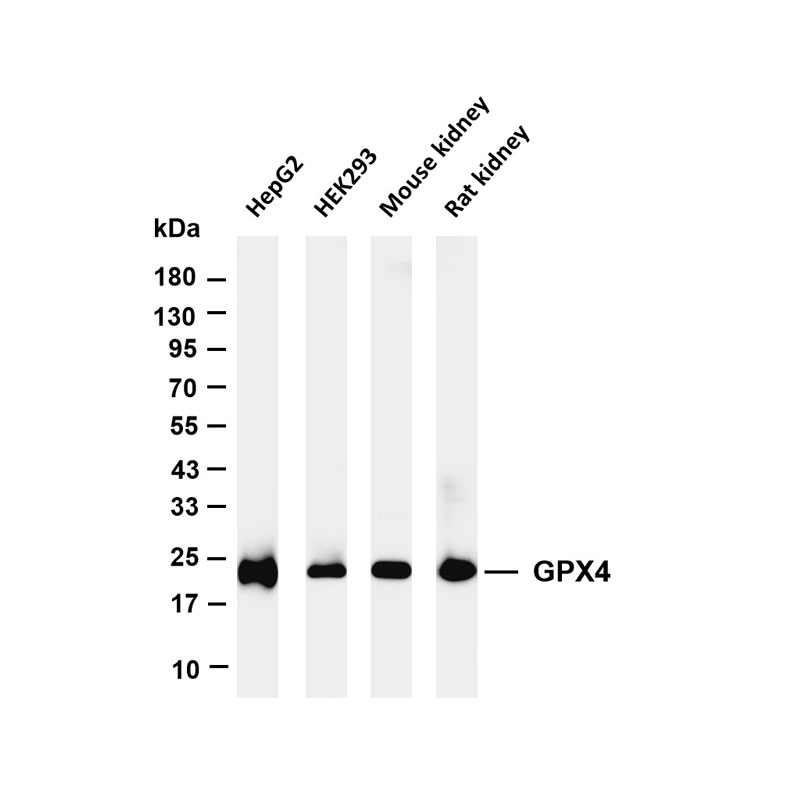
VI. Detection and Result Analysis
Chemiluminescent Detection: Remove the membrane, blot dry surface liquid with filter paper, evenly apply chemiluminescent detection substrate (e.g., ECL substrate), incubate for 1-2 minutes, and place in a gel imaging system for exposure. Adjust exposure time based on band intensity to obtain clear protein band images.
Result Analysis: Use image analysis software (e.g., ImageJ) to quantify the gray value of protein bands. The relative expression level of the target protein is represented by the ratio of the gray value of the target protein band to that of the internal reference protein (e.g., GAPDH, β-actin), which is used to analyze differences in target protein expression among samples.
Related Resource Links


Related Promotional Journal Downloads


Explore Our Recommended Popular Products
More products

30,000+ high- quality products available online
Primary Antibodies, Secondary Antibodies, mIHC Kits, ELISA Kits, Proteins, Molecular Biology Products,Cell Lines,Reagents ...
Contact Us
-

400-801-6722
-

support@lamarck.cn
-


Order
-

Message